Let’s assume that we have a lot of scanned images that require some sort of transcription. Such labour can often be time consuming, while also demands a manual human interaction. Microworkers’ Template Test & Verification (TTV) incomparably lessens the time factor utilizing the power of crowdsourcing.
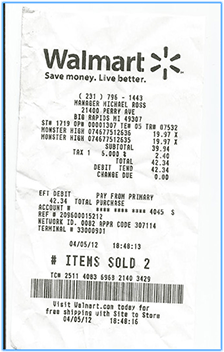
For the purpose of this example we used a piece of paper that each of us meets daily, a shopping receipt. With (TTV) campaign we are going to transcribe only the specific information that can be found on the scan.
Let’s now see how we can adjust the Template to serve the need.
Guide is mainly based on TTV’s Template Editor in Source Code

Firstly, have a quick look below on the Template and task preview, so you may see how the entire project is visually conceived.
Template Preview: (requires Microworkers account login): Classify Shopping Receipt
Screen-capture of task from Worker’s perspective: (click image to enlarge)
![]()
We will now dive deeper into the coding and styles which have been used for making this Template. (we’ve parsed an entire Template’s code on snippets to get things easier and hence simplify the follow-up process)
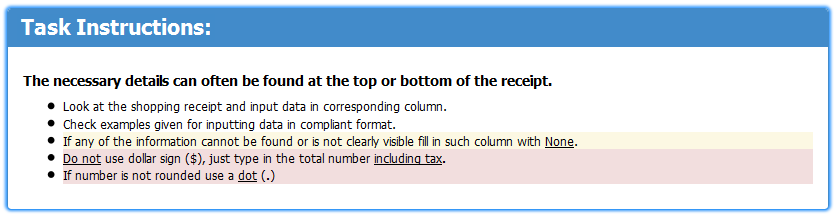
- Task Instructions Panel
For a list of instructions we’ve utilized Bootstrap Primary Panel class as a container. To emphasize more sensitive ones, we took advantage of styles from Bootstrap Text/Typography styling sheet.
<!-- Instructions -->

<div class="panel panel-primary">

<div class="panel-heading"><strong>Task Instructions:</strong></div>

<div class="panel-body">

<h5><strong>The necessary details can often be found at the top or bottom of the receipt. </strong></h5>

<ul>

<li>Look at the shopping receipt and input data in corresponding column.</li>

<li>Check examples given for inputting data in compliant format.</li>

<li>

<p class="bg-warning">If any of the information cannot be found or is not clearly visible fill in such column with <u>None</u>.</p>

</li>

<li>

<p class="bg-danger"><u>Do not</u> use dollar sign ($), just type in the total number <u>including tax</u><strong>.</strong></p>

</li>

<li>

<p class="bg-danger">If number is not rounded use a <u>dot</u> (<strong>.</strong>)</p>

</li>

</ul>

</div>

</div>

<!-- End Instructions -->
(Coding Source: BS Panels, BS Typography)
- Shopping Receipts Source
Since our project requires more than a few images for working on, we need a CSV callback to incorporate many into a Template, different one for each assignment (Microworkers CSV approach explained). The process is easy, similar as to how we’ve explained it in our previous blog post Creating Template With Images, however, the only difference is that instead a direct link to an image we put CSV variable ${images}, in this specific case.
Visual Editor: Click Here
Template doesn’t include a CSV file itself, an option for attaching a CSV will be given later, during the campaign setup
<!-- Csv -->

<div class="row">

<div class="text-left">

<div class="col-sm-6">

<div><img alt="image_url" class="img-thumbnail" src="${images}" /></div>

</div>

</div>

<!-- End Csv -->
(Coding Source: BS Images, HTML IMG src Attribute )
- Data Input
Now, as we are done with instructions and supplying our Template with raw data, it’s time to take care of where that transcribed data are supposed to be inputted. For this purpose we chose Bootstrap Input forms placing each one inside the same-already-used panel now with Info class for better layout.
Visual Editor: Click Here
Important:
When working with Input (text area) forms, it’s very important to give an adequate term to a name column/code to avoid any potential overlap among collected data.

<!-- Store -->
<div class="col-sm-6">
<div class="form-group">
<div class="panel panel-info">
<div class="panel-heading"><span style="color:#000000;"><strong>Store Name: </strong></span></div>
<div class="panel-body"><input class="form-control" name="store" placeholder="Business name" type="text" />
<h4><sup><span class="label label-default">Example: McDonald's, H&M, Lidl</span></sup></h4>
</div>
</div>
<!-- End Store -->
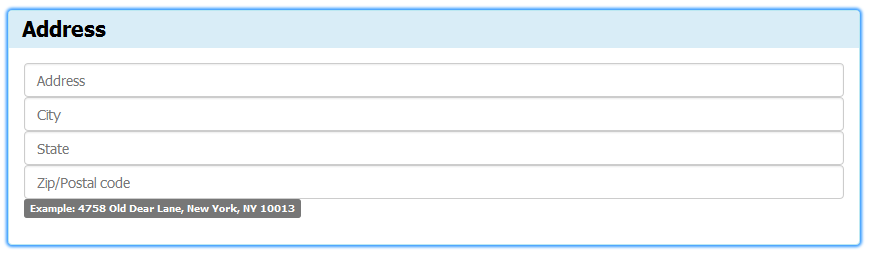
<!-- Address -->

<div class="panel panel-info">

<div class="panel-heading"><span style="color:#000000;"><strong>Address: </strong></span></div>

<div class="panel-body"><input class="form-control" name="address" placeholder="Address" type="text" />

<input class="form-control" name="city" placeholder="City" type="text" />

<input class="form-control" name="state" placeholder="State" type="text" />

<input class="form-control" name="zip" placeholder="Zip/Postal code" type="text" />

<h4><sup><span class="label label-default">Example: 4758 Old Dear Lane, New York, NY 10013 </span></sup></h4>

</div>

</div>

</div>

<!-- End Address -->

<!-- Phone -->

<div class="panel panel-info">

<div class="panel-heading"><span style="color:#000000;"><strong>Phone Number:</strong></span></div>

<div class="panel-body"><input class="form-control" name="phone" placeholder="Phone" type="tel" />

<h4><sup><span class="label label-default">Example: (800) 123-4567 or 8001234567 </span></sup></h4>

</div>

</div>

<!-- End Phone -->

<!-- Total Amount -->

<div class="panel panel-info">

<div class="panel-heading"><span style="color:#000000;"><strong>Total Amount:</strong></span></div>

<div class="panel-body"><input class="form-control" name="total" placeholder="Total cash/due/amount" type="text" />

<h4><sup><span class="label label-default">Example: 10, 20.50, 35.68 </span></sup></h4>

</div>

</div>

</div>

<!-- End Total Amount -->
(Coding Source: BS Responsive Grid, BS Panels, BS Form Inputs, BS Level and Badges, HTML Superscript)

<h4><sup><span class="label label-default">Example: (800) 123-4567 or 8001234567 </span></sup></h4>(Coding Source: BS Level and Badges, HTML Superscript)
Don’t forget to contact us for any concerns you might have during the creation or anything in connection with (TTV) utilization. We’ll give our best to assist.
Until the next Template tutorial please stay tuned!
No Comments so far.
Your Reply